
Configure the native Samsung Email application on your smartphone or tablet using secure IMAP/POP3 server routing.
Set up email on a Samsung device, like your smartphone or tablet, to manage your emails anywhere from your mobile device. If you are configuring your mailbox for the first time, don’t worry! Samsung’s built-in Email app makes the process straightforward, and you can update your sync preferences later if needed. By following these steps, you’ll be able to send and receive emails securely from your mobile device wherever you are. This guide will help you configure your custom 1-grid hosting mailbox using the native Samsung Email app on your device.
- Before You Begin
- Follow These Steps
- 1. Open Your Device Account Settings
- 2. Enter Account Management
- 3. Initialise the Email Provisioning Loop
- 4. Choose Your Setup Framework
- 5. Input Credentials and Attempt Auto-Discovery
- 6. Configure Manual Server Settings (If Required)
- 7. Review and Adjust Synchronisation Settings
- 8. Finish and Lock Your Mailbox Profile
- What Happens Next?
- Important Things to Know
- Common Mistakes to Avoid
- If This Didn’t Work
- You’re Ready!
- Related Articles
- Need Help?
Before You Begin
Before initiating your mobile email configuration paths, make sure you have:
- An active 1-grid Web Hosting or Email Only hosting subscription.
- Your full custom domain email address (e.g.,
[email protected]) and unique mailbox password. - Your explicit incoming and outgoing mail server hostnames (if automatic detection stalls).
- The native Samsung Email app open on your phone or tablet.
💡 Tip: The Samsung Email app should appear on your device by default. If it is missing from your screen layout, you can quickly download it for free from the Galaxy Store or Google Play Store.
Follow These Steps
1. Open Your Device Account Settings
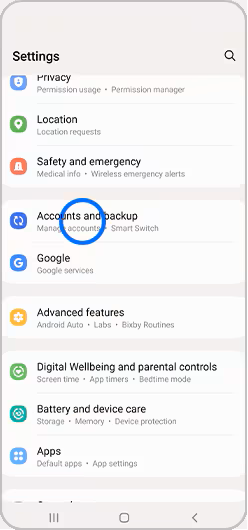
Unlock your Samsung device and tap the gear icon button to launch Settings. Scroll down the interface options menu list and select Accounts and Backup.
2. Enter Account Management
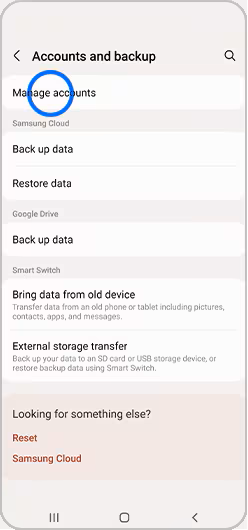
Tap Manage Accounts to open a comprehensive real-time list of all profiles currently configured on your device storage.
3. Initialise the Email Provisioning Loop
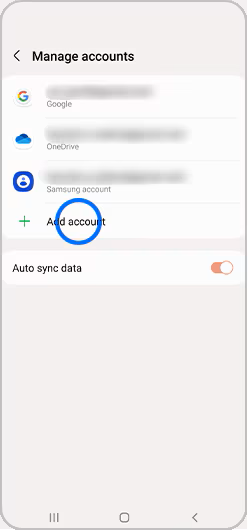
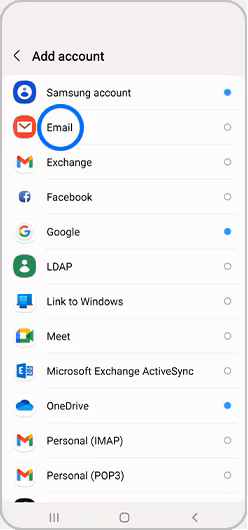
Scroll to the bottom of your active account rows and tap + Add Account. From the populated application type grid, select Email.
4. Choose Your Setup Framework
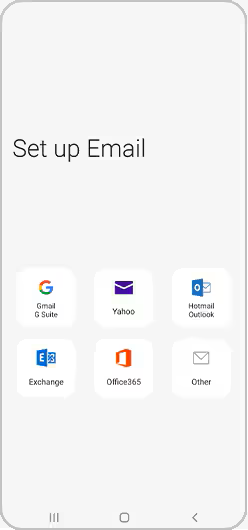
You will see a list of major global email providers.
- If you are routing a common platform layout (like Gmail or Yahoo), select it directly.
- For your custom 1-grid business email domain name, select Other or Manual Setup to control your mail routing preferences.
5. Input Credentials and Attempt Auto-Discovery
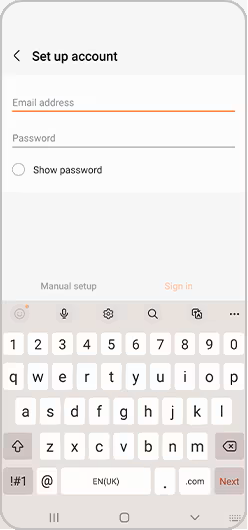
Enter your full unique email address and mailbox password in the provided fields, then tap Sign In or Next. Depending on your network, Samsung may automatically detect your hosting parameters. If automatic sync fails, select Manual Setup.
6. Configure Manual Server Settings (If Required)
If the auto-discovery script stalls, select your preferred protocol (we strongly recommend IMAP over POP3) and enter the exact server details supplied for your email hosting service:
- Incoming Mail Server: Enter your server name hostname, verify the secure port number (typically
993for secure IMAP), and select the SSL/TLS security type. - Outgoing Mail Server (SMTP): Enter your primary outbound server name hostname, set the secure port number (typically
465for secure SMTP), choose SSL/TLS security, and ensure SMTP Authentication is ticked using your full email credentials.
7. Review and Adjust Synchronisation Settings
Once authenticated, review and confirm your preferences regarding automated system sync behaviours. Choose how often you want your device to check for new mail items and toggle whether you want instant push notifications for new messages.
8. Finish and Lock Your Mailbox Profile
Review your custom display name details and tap Done or Finish. Your mailbox will initialise its initial data sync tree, downloading your remote server folders straight onto your device workspace.
What Happens Next?
Once saved, your mobile phone communicates natively with our hosting servers.
- Real-Time Delivery: Incoming messages arrive seamlessly based on your chosen frequency intervals.
- Bi-Directional Syncing: Actions executed on your phone (like moving an item to a custom folder or archiving an invoice) synchronise back to your desktop clients automatically if using IMAP.
Important Things to Know
- IMAP vs POP3 Priority: POP3 downloads server files locally and completely clears them from mail servers. Always choose IMAP to ensure your business communication rows remain archived securely in the cloud and across multiple devices.
- The Active Connection Rule: Your smartphone or tablet device must maintain a stable, active cellular data network connection or local Wi-Fi link throughout the setup phase to pass validation checks.
- Widgets and Shortcuts: You can add email widgets straight to your mobile home screen panel layout later to view snapshots of your latest client requests at a glance.
Common Mistakes to Avoid
- Typing your absolute billing email address details into columns requiring your specific custom domain credentials.
- Missing or typing uppercase/lowercase characters accidentally inside your alphanumeric mailbox password fields.
- Utilising incorrect ports, such as using unencrypted port values while forcing an SSL/TLS security connection framework.
- Forgetting to toggle the mandatory outbound SMTP authentication checkboxes, which lets you receive mail but blocks you from sending it.
- Closing out the progress bars before the system successfully concludes its initial server verification handshake.
If This Didn’t Work
If your device outputs a continuous “Cannot connect to server” or timeout log alert message, try switching your connection from mobile cellular data over to a stable Wi-Fi network (or vice versa) to bypass local ISP routing blocks. Verify your transfer criteria by testing an absolute login via your 1-grid Webmail browser interface to confirm your master account password is valid, and then try to set up email on a Samsung device again.
You’re Ready!
Your Samsung device email configuration is completely operational. Accessing your inbox on the move keeps you connected with your customer base, streamlines your operations, and ensures you never miss a vital local business opportunity.
Related Articles
- Viewing Your Email Settings in Windows Plesk
- Viewing Your Email Settings in cPanel and Webmail
- IMAP vs POP: Which Email Protocol Should You Choose?
- Recommended Server Settings for Email (Encryption & Ports)
- Setting Up Email in Outlook via Windows Control Panel
- Settings to Configure Your 1-grid Email Accounts Across Devices
- Troubleshooting Email Sending and Receiving Issues
Need Help?
If your Samsung device loops continuously during incoming server handshakes, or throws unexpected security certificate blocks that stall your data sync, contact us. Our Support Team is ready to provide guidance and support.
Before opening a support ticket, please prepare:
- Your primary domain name and active email address string.
- Your exact Samsung device model (e.g., Galaxy S24) and current Android version.
- A screenshot of your manual server settings panel configurations.
- The complete text string code of any active error messages displayed on screen.