
Step-by-step guide to manually moving your website files, databases, and emails from cPanel to Plesk Obsidian.
Migrating your digital architecture between different hosting control panels can feel like a daunting task. Because cPanel and Plesk operate on completely distinct system environments, automated server-side account transfers are not supported. This guide walks you through downloading your data, uploading your website files, importing your databases, and securely syncing your email mailboxes onto your new Linux platform.
Before You Begin
Before initiating your cross-panel migration, make sure you meet the following baseline requirements:
- An active 1-grid Plesk package (Contact our Support or Sales Team to place an order for the new package if you haven’t already).
- Active administrative login credentials for both your legacy cPanel dashboard and your new Plesk control panel.
- Sufficient local storage space on your computer to download your website backups, databases, and
.pstemail archive files.
💡 Context: This manual migration involves extracting your files from cPanel, rebuilding your technical database frameworks within Plesk, and utilising an IMAP client setup loop to shift your mailbox history seamlessly.
Follow These Steps
1. Backup Website Files on cPanel
- Step 1: Log in to your legacy cPanel dashboard using your current hosting credentials.
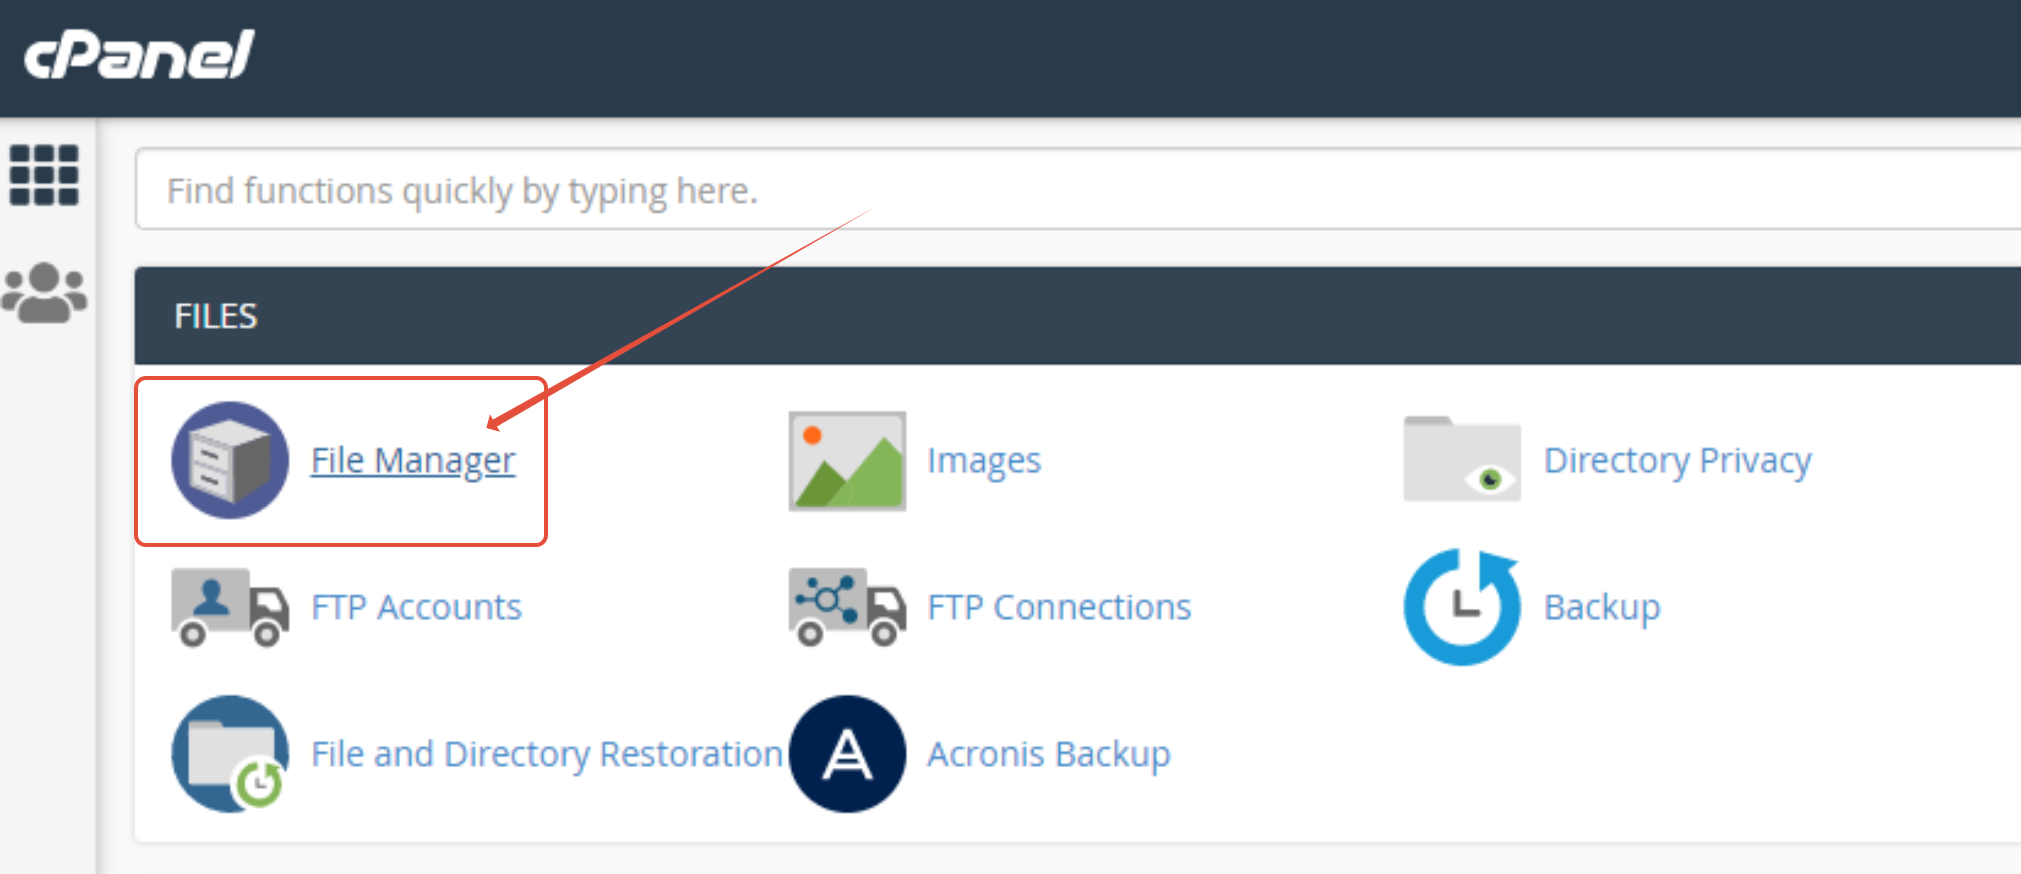
- Step 2: Scroll down to the Files section block layer and select File Manager.
- Step 4: Highlight the newly generated compressed zip file inside your file manager explorer grid and click Download. This saves it locally to your computer.

2. Export Your Database from cPanel
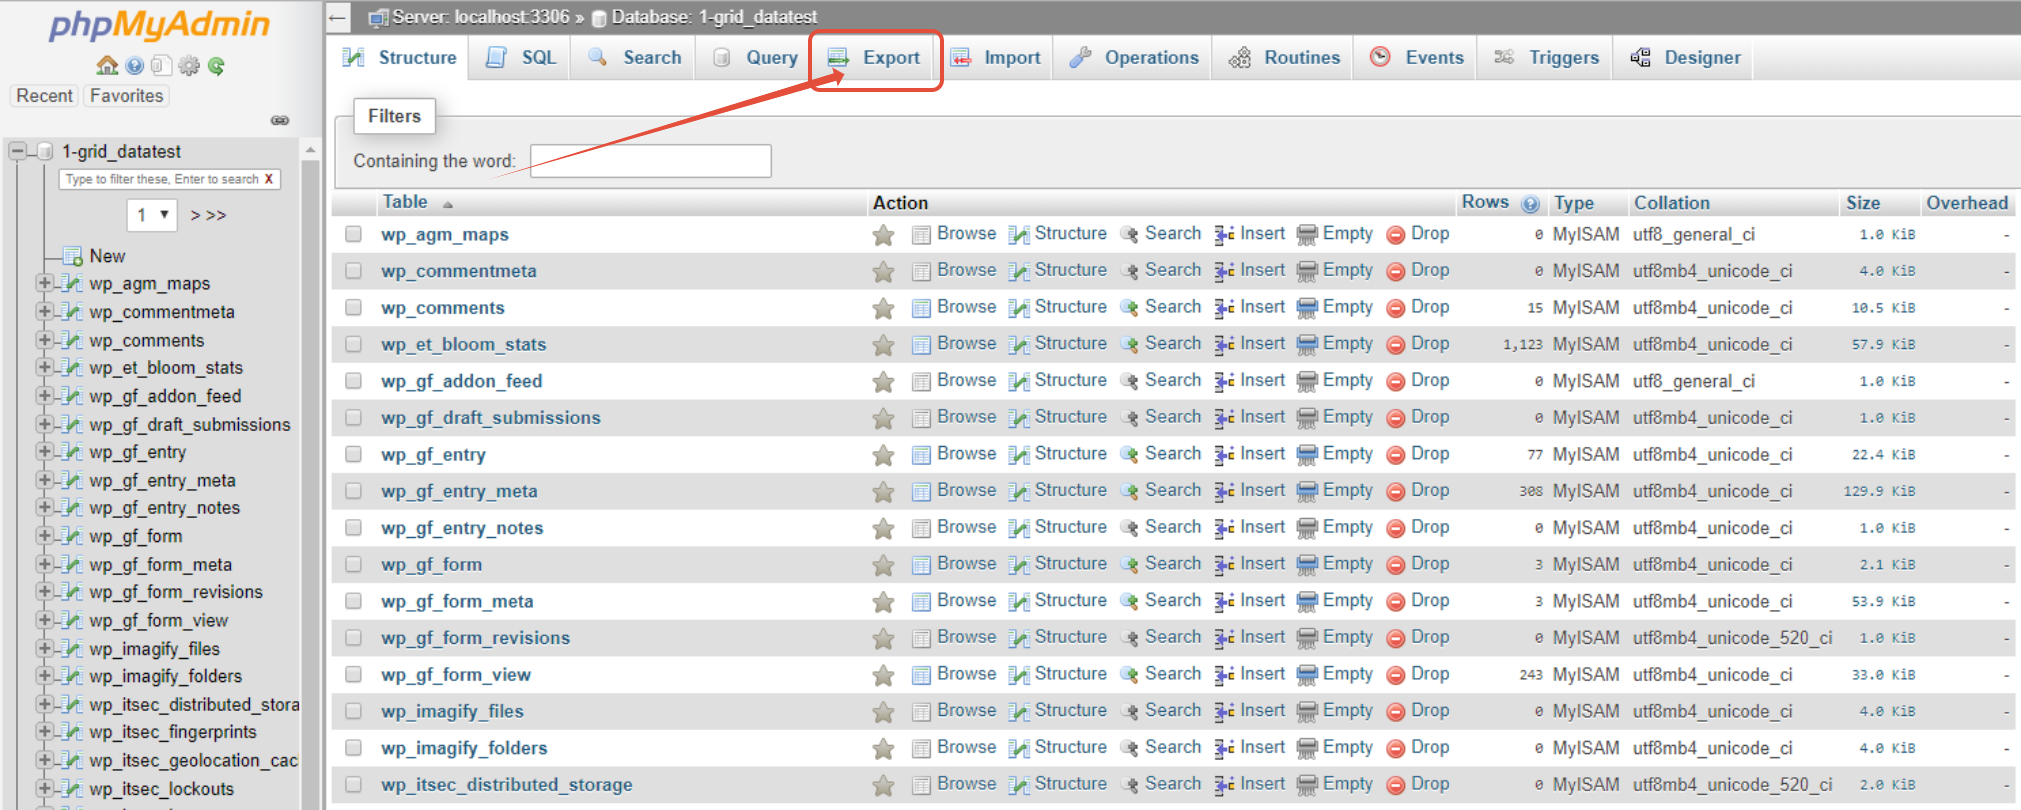
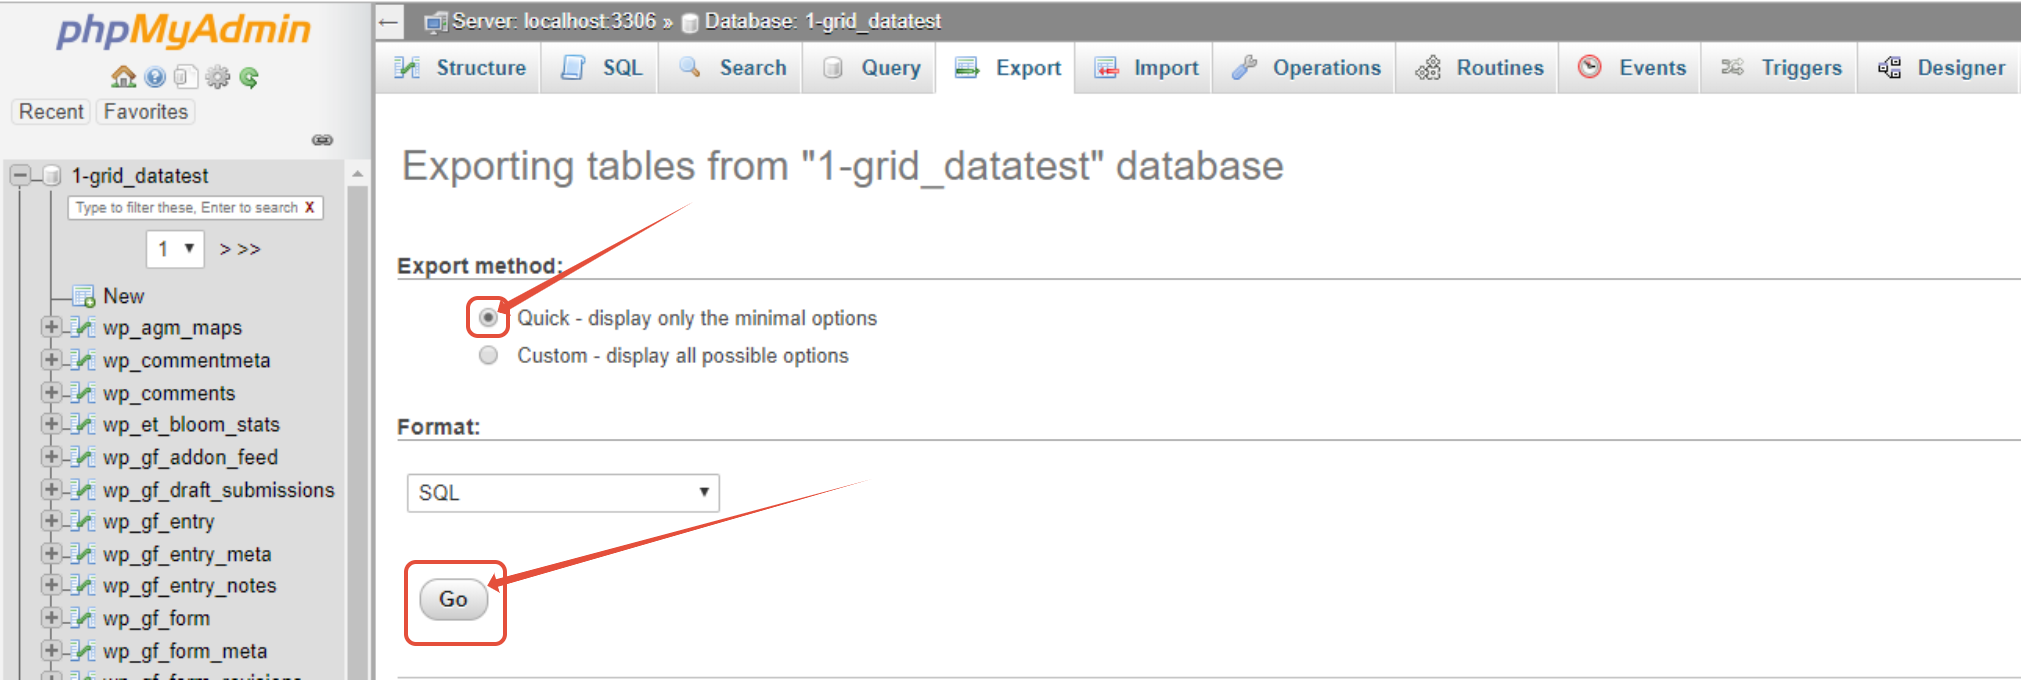
- Step 4: Keep the selection marked at Quick Method, ensure the format dropdown reads SQL, and click Go to fetch your raw
.sqlfile dump.


3. Upload Website Files to Plesk
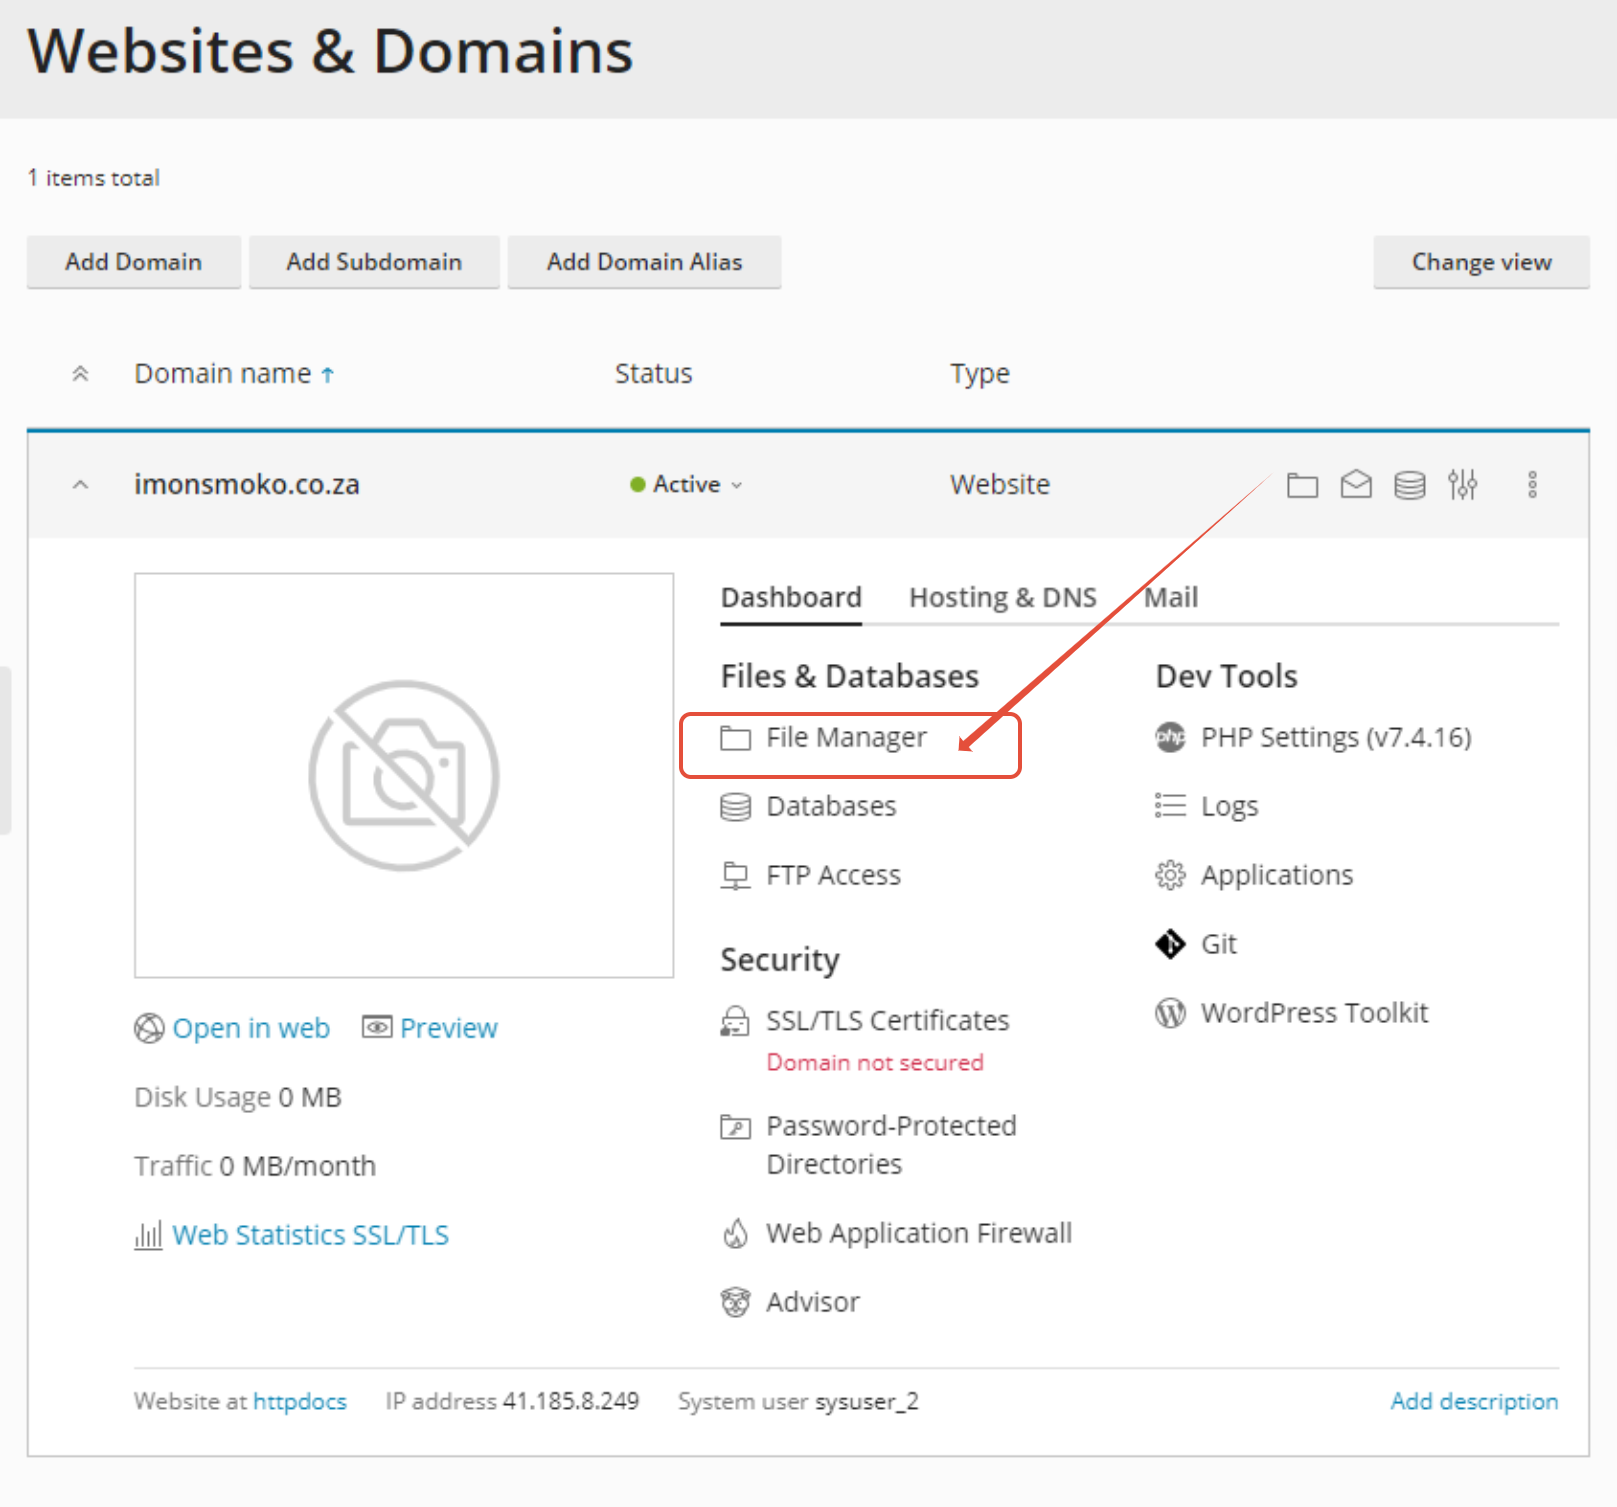
- Step 1: Log in to your new Plesk control panel using the administrative username and password received during purchase sign-up.
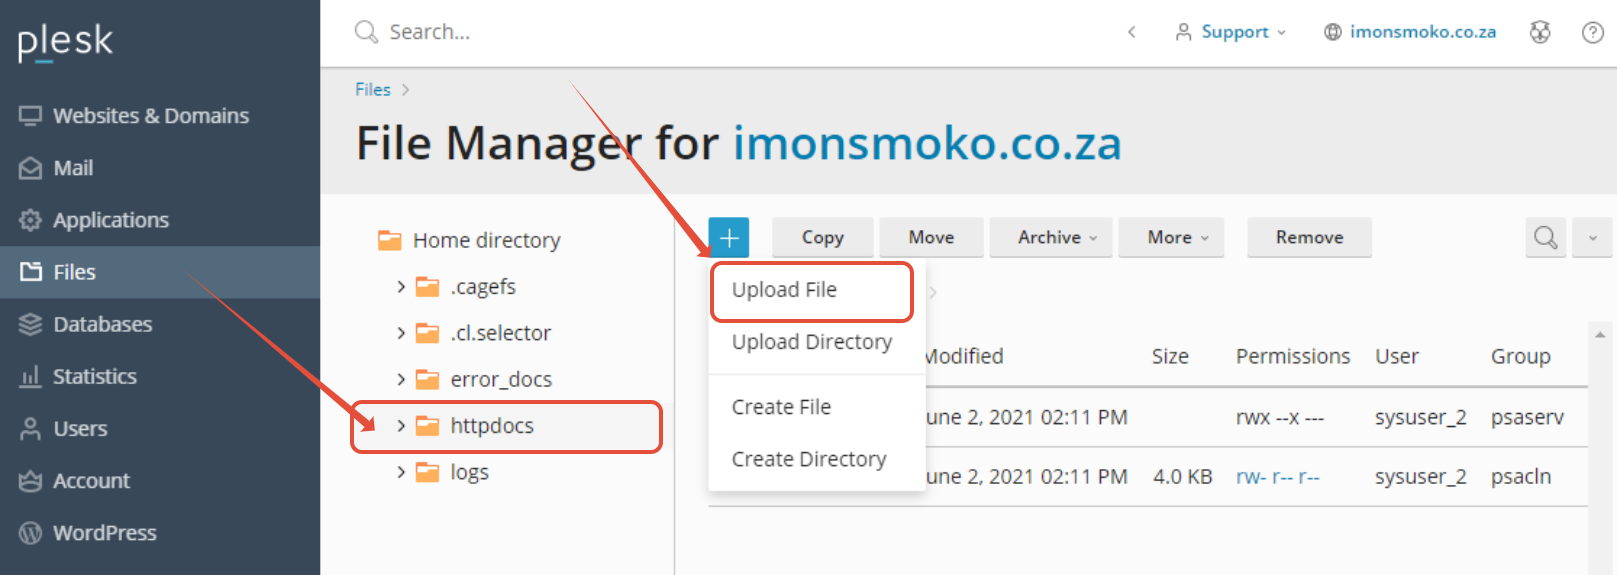
- Step 3: Select the target public web directory, which is named httpdocs under the Plesk Linux core framework architecture.
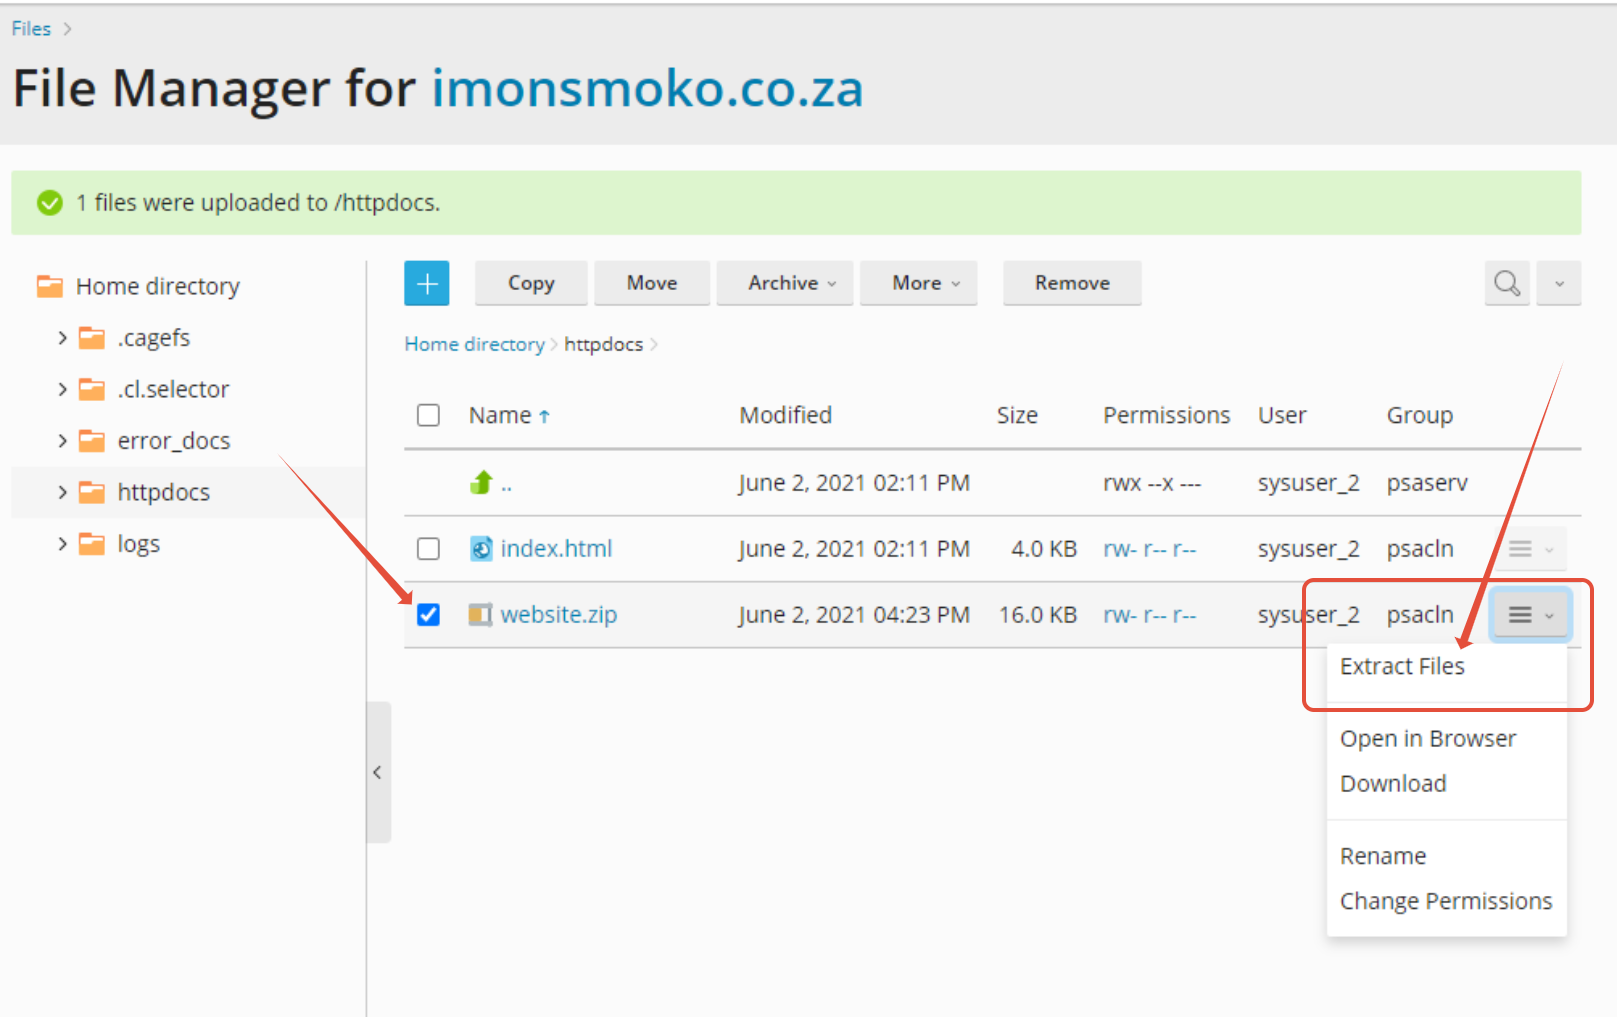
- Step 5: Highlight the uploaded zip file row item inside the file editor view and click Extract Files. This unpacks your data asset layout.

4. Import Your Database to Plesk
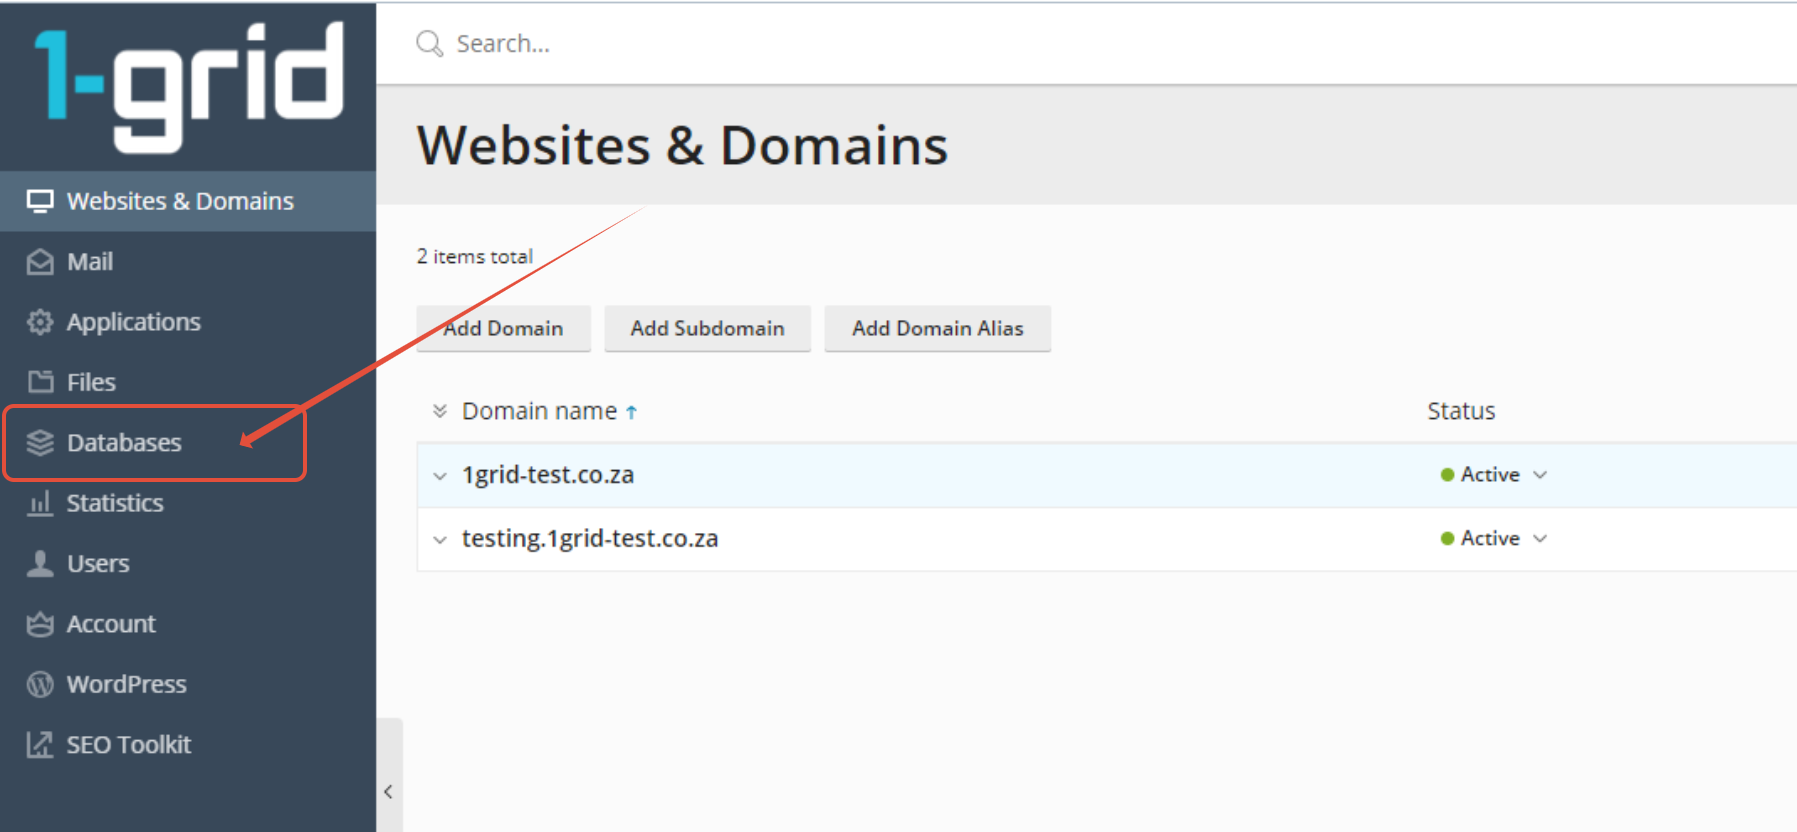
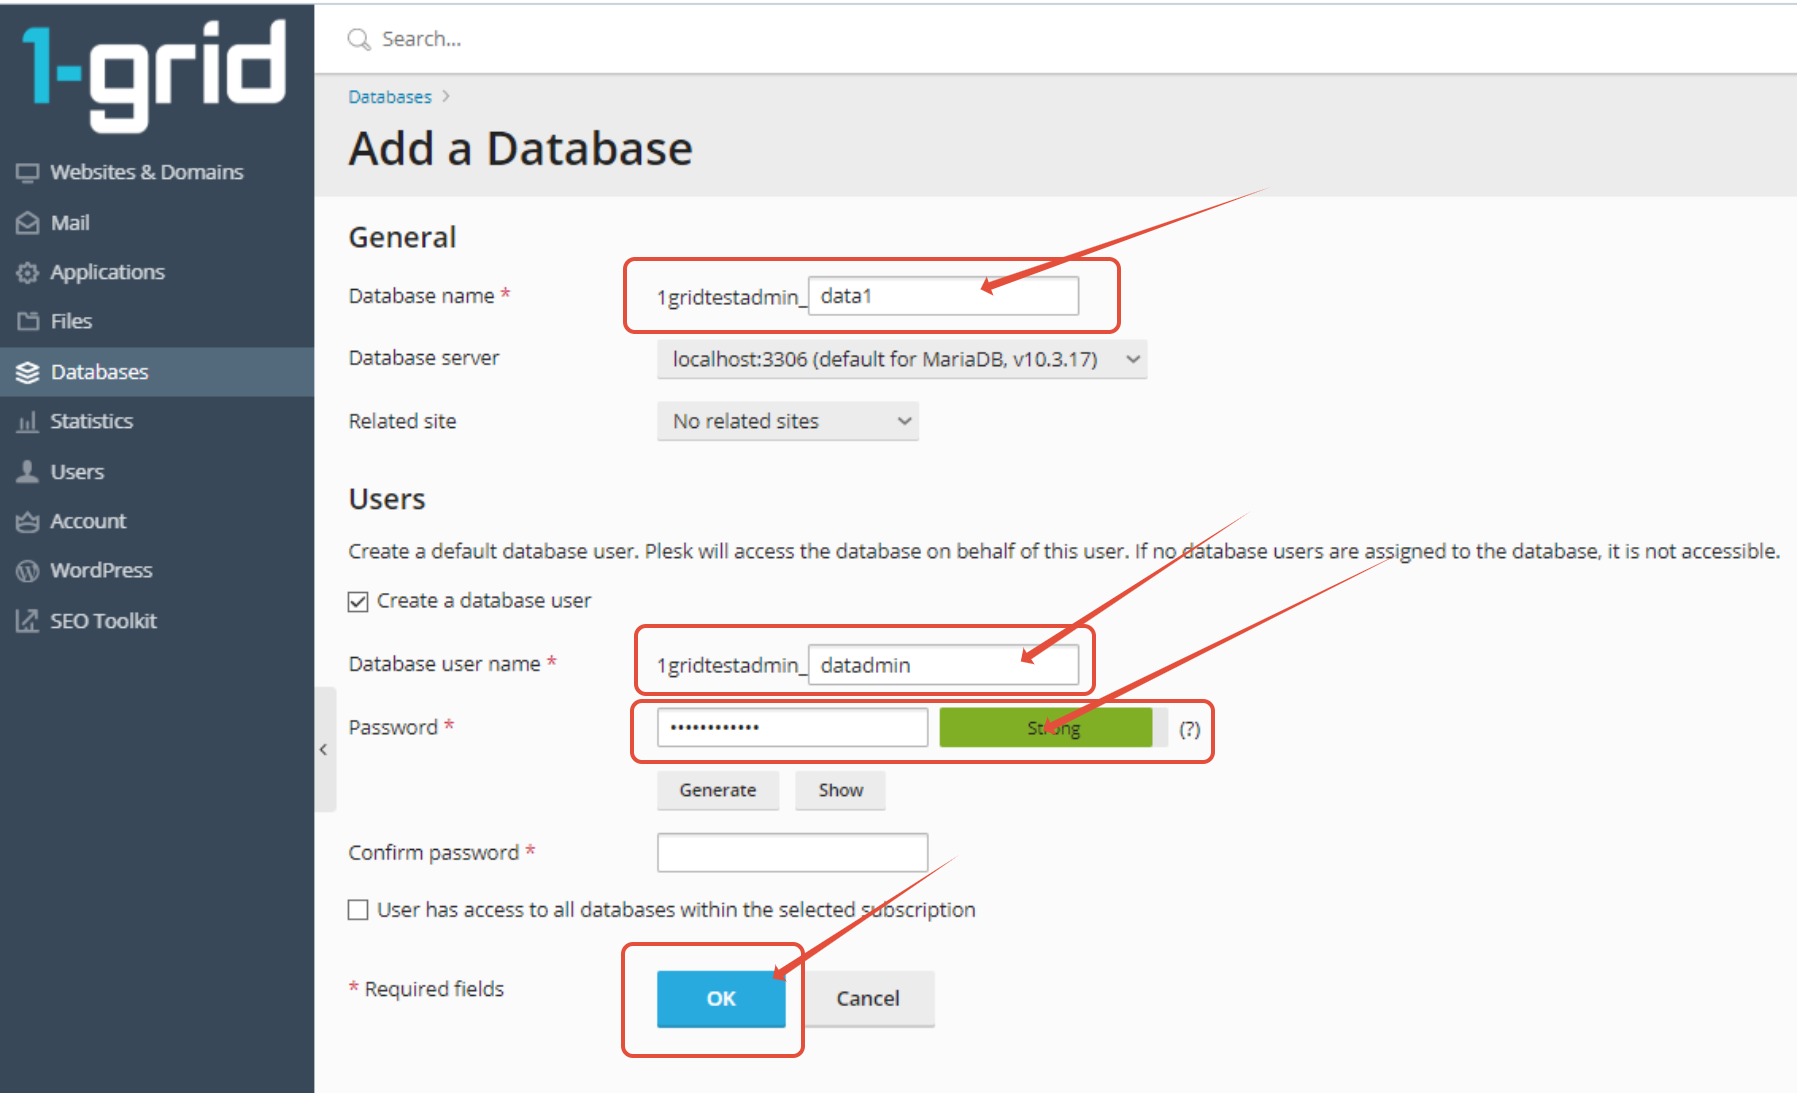
- Step 2: Click the Add Database icon link row, complete your new database name parameters, assign a fresh database user profile with a robust password, and click Save.
- Step 4: Browse your local computer files, select the raw
.sqldatabase backup file extracted from cPanel, and confirm the screen prompt to initialise your tables.


5. Complete Your Email Migration
Because cPanel and Plesk utilise entirely distinct file structures and mail storage rules, a direct server-side automated email migration is not possible. You must back up your data locally and migrate using the IMAP manual method:
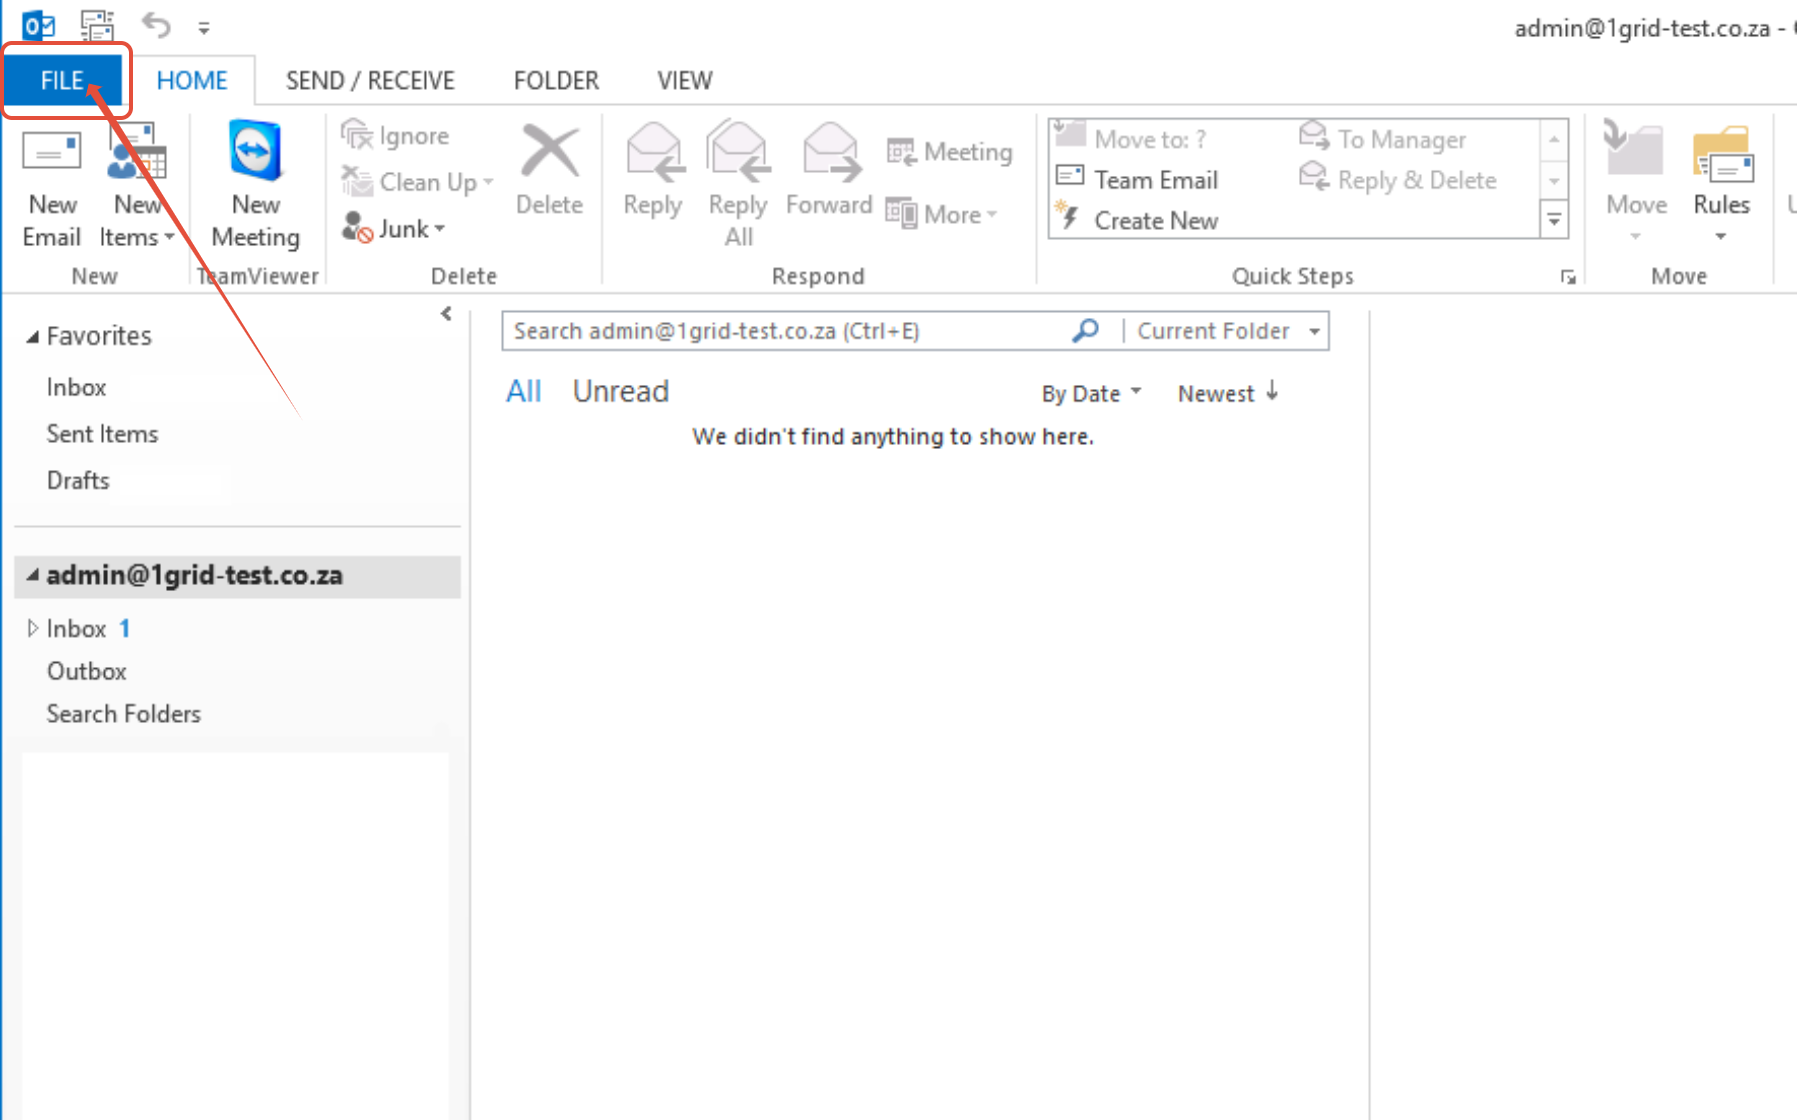
Phase A: Back up Your Outlook Emails Locally
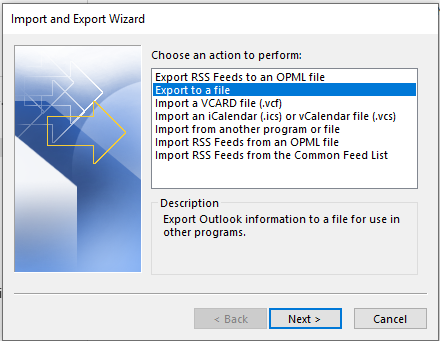
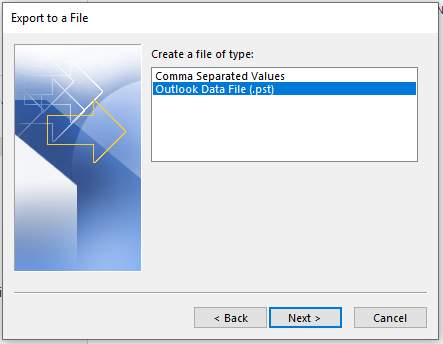
- Step 3: Highlight the option labelled Export to a file from the wizard list layout, click Next, and select Outlook Data File (.pst).
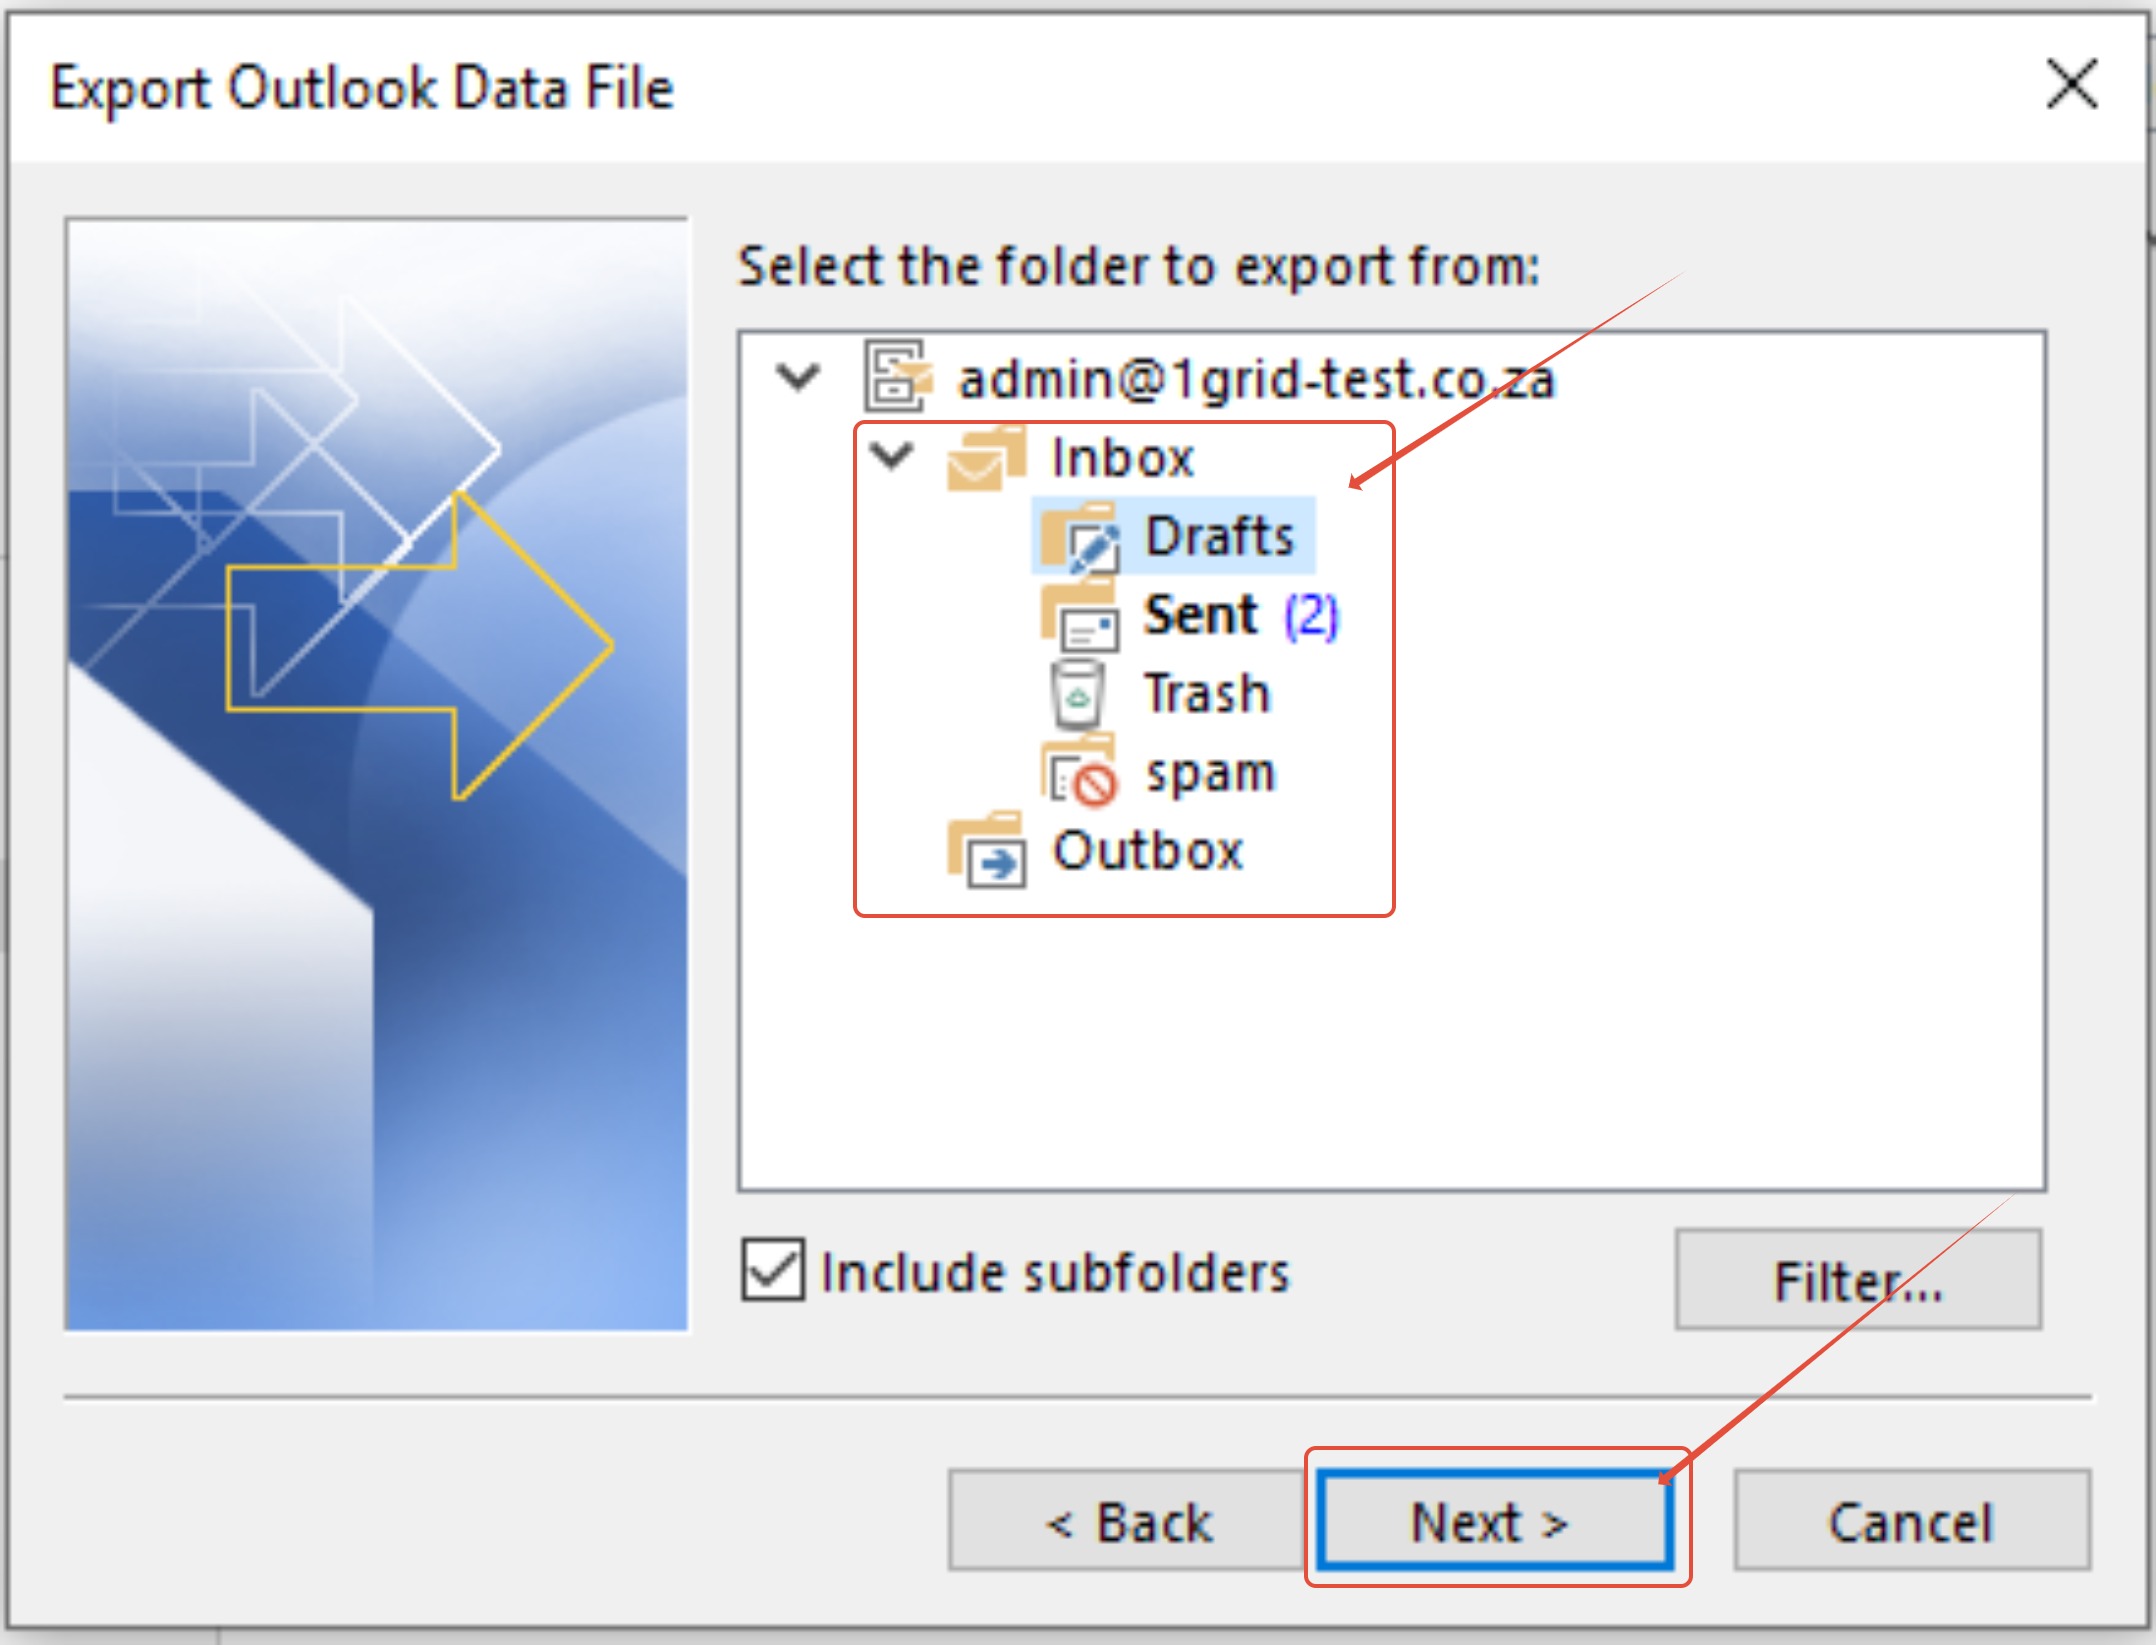
- Step 4: Select the explicit email address mailbox tree you wish to secure, ensure nested folders are checked, and click Next.
- Step 5: Click Browse to select a safe local destination path folder on your computer for your backup file, click Finish, and enter an optional security encryption password if desired.

 |  |

Phase B: Sync Mailboxes Using the IMAP Client Drag-and-Drop Method
- Step 1: Configure both your legacy source email account (cPanel) and your new destination mailbox account (Plesk) inside a desktop mail application like Mozilla Thunderbird using the IMAP protocol.
- Step 2: Click into your legacy source account’s Inbox folder row, highlight all historical messages (press Ctrl + A or Cmd + A on your keyboard layout), and click on any highlighted block.
- Step 4: Keep your computer running online; the IMAP protocol will automatically synchronise all transferred data back onto our new Plesk hosting infrastructure servers behind the scenes. Repeat this action loop for custom sub-folders or your sent archive categories.
For more steps on migrating your emails using IMAP, see How to Migrate Your Email Using IMAP.
What Happens Next?
Once files, database configurations, and mail accounts are securely ported into Plesk, your environment is ready to handle/establish active web routing.
- DNS Update Layer: To make your migration live to the public, you must update your domain nameservers or point your primary A Records to your new Plesk server IP address.
- Propagation Alignment: After applying your DNS zone updates, allow standard internet service provider network propagation loops to clear out cached records worldwide before shutting down your old cPanel instance.
Important Things to Know
- The Environment Boundary: Core file systems differ between the two panels. In cPanel, public folders are mapped inside
public_html, whereas Linux Plesk assigns public files exclusively to the httpdocs directory layer. Pushing files to alternative directories will break site loading hooks. - The POP3 Erasure Danger: If you are using POP3, do not delete your legacy client profile layout. POP3 downloads messages locally and clears them from mail servers; erasing profiles will drop data permanently. Lean on secure IMAP mappings.
- Configuration Script Syncing: Because your database names, system users, and profile passwords change when rebuilding configurations inside Plesk, you must edit your site’s central configuration profile (e.g.,
wp-config.phpfor WordPress) to match your new database values. - Uptime Preservation Best Practice: Keep your legacy cPanel package active and running alongside your new Plesk package for at least 48 hours. This allows the DNS changeover to ensure web hits and incoming emails do not get lost mid-route.
Common Mistakes to Avoid
- Uploading your raw cPanel data assets directly inside the root folder map instead of opening the mandatory httpdocs target panel directory.
- Forgetting to update your web framework database configuration text connection strings after deploying your raw
.sqlparameters inside Plesk. - Running total data drops or closing your desktop application screens while background IMAP client drag-and-drop queues are still syncing.
- Naming manual text database backups incorrectly or misconfiguring permissions during user setups.
- Shutting down your old hosting container package prematurely before checking global site propagation statuses.
If This Didn’t Work
Should your target web pages throw immediate database connection error codes post-extraction, open your script configurations to confirm your database name prefixes match your Plesk database configurations.
If your desktop mail software throws continuous authentication loop errors while executing your IMAP drag-and-drop synchronisation steps, check for localised anti-virus security blocks or verify that your mail ports match.
You’re Ready!
Your multi-layered migration process from cPanel over to your clean Plesk Linux dashboard environment is completely finalised. Checking your links, testing your contact form fields, and verifying your inbox routes ensures a seamless migration experience.
Related Articles
- How to View Website Statistics and Traffic Reports in Plesk | 1-grid Knowledge Base
- How to Migrate Your Email Using IMAP | 1-grid Knowledge Base
- How to Change PHP Versions in Plesk | 1-grid Knowledge Base
- Plesk Guides | 1-grid Knowledge Base
Need Help?
If your framework archives fail to extract inside the Plesk File Manager, or if your underlying database structures throw system execution errors during dump imports, contact us. Our Support Team is ready to offer support and guidance.
Before opening a ticket, please prepare:
- Your primary domain name and active portal customer code.
- The specific names of the cPanel database and new Plesk database containers.
- A screenshot of your File Manager file path views showing the error state.
- The complete log text strings outputting inside your terminal or console display framework.